
 فقط پیامک (09010609492)
Autodesk Inventor 2016 Learn by doing
مونتاژ ورقکاری نقشه کشی و شبیه سازی در Autodesk Inventor
آموزش جامع (مدل سازی، مونتاژ، ورقکاری، نقشه کشی، شبیه سازی) نرم افزار Autodesk Inventor، آموزشی جامع و کم نظیر از نرم افزار اینونتور می باشد. الگوی آموزشی این کتاب مبتنی بر آموزش با مثال می باشد...
محصولات مرتبط


Autodesk Inventor 2016 Learn by doing
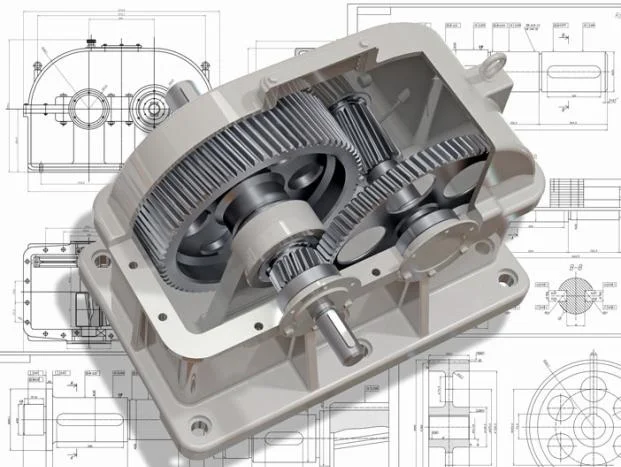
آموزشی جامع و کم نظیر از نرم افزار اینونتور می باشد. الگوی آموزشی این کتاب مبتنی بر آموزش با مثال می باشد. در این کتاب آموزشی، کاربر اینونتور با نحوه طراحی و مدلسازی، مونتاژ، ورقکاری، ایجاد نقشه اجرایی و شبیه سازی حرکت مطابق تصاویر زیر در محیط اینونتور Autodesk Inventor آشنا می شود.
 |  |  |
Autodesk Inventor 2016 Learn by doing مشتمل بر 165 صفحه، در 8 فصل، به زبان انگلیسی روان و به همراه تصاویر هر محیط و نوار ابزارها، به ترتیب زیر گردآوری شده است:
Autodesk Inventor 2016 Learn by doing
Table of Contents
Chapter 1: Getting Started with Inventor 2016
- Starting Autodesk Inventor
- User Interface
- Ribbon
- Application Menu
- Quick Access Toolbar
- Browser window
- Status bar
- Navigation Bar
- View Cube
- Shortcut Menus and Marking Menus
- Dialogs
- Customizing the Ribbon, Shortcut Keys, and Marking Menus
- Color Settings
Chapter 2: Part Modeling Basics
- TUTORIAL 1
- Creating a New Project
- Starting a New Part File
- Starting a Sketch
- Adding Dimensions
- Creating the Base Feature
- Adding an Extruded Feature
- Adding another Extruded Feature
- Saving the Part
- TUTORIAL 2
- Starting a New Part File
- Sketching a Revolve Profile
- Creating the Revolved Feature
- Creating the Cut feature
- Creating another Cut feature
- Adding a Fillet
- Saving the Part
- TUTORIAL 3
- Starting a New Part File
- Creating the Cylindrical Feature
- Creating Cut feature
- Saving the Part
- TUTORIAL 4
- Start Extruded feature
- Applying Draft
- Saving the Part
Chapter 3: Assembly Basics
- TUTORIAL 1
- Top-Down Approach
- Bottom-Up Approach
- Starting a New Assembly File
- Inserting the Base Component
- Adding the second component
- Applying Constraints
- Adding the Third Component
- Checking the Interference
- Saving the Assembly
- Starting the Main assembly
- Adding Disc to the Assembly
- Placing the Sub-assembly
- Adding Constraints
- Placing the second instance of the Sub-assembly
- Saving the Assembly
- TUTORIAL 2
- Starting a New Presentation File
- Creating the Exploded View
- Animating the Explosion
Chapter 4: Creating Drawings
- TUTORIAL 1
- Starting a New Drawing File
- Editing the Drawing Sheet
- Generating the Base View
- Generating the Section View
- Creating the Detailed View
- Creating Centermarks and Centerlines
- Retrieving Dimensions
- Adding additional dimensions
- Populating the Title Block
- Saving the Drawing
- TUTORIAL 2
- Creating New Sheet Format
- Creating a Custom Template
- Starting a Drawing using the Custom template
- Adding Dimensions
- TUTORIAL 3
- Creating a New Drawing File
- Generating Base View
- Generating the Exploded View
- Configuring the Parts list settings
- Creating the Parts list
- Creating Balloons
- Saving the Drawing
Chapter 5: Additional Modeling Tools
- TUTORIAL 1
- Creating the First Feature
- Adding the Second feature
- Creating a Counterbore Hole
- Creating a Threaded hole
- Creating a Circular Pattern
- Creating Chamfers
- TUTORIAL 2
- Creating the first feature
- Creating the Shell feature
- Creating the Third feature
- Creating a Cut Feature
- Creating the Rib Feature
- TUTORIAL 3
- Creating the Coil
- TUTORIAL 4
- Creating First Section and Rails
- Creating the second section
- Creating the Loft feature
- Creating the Extruded feature
- Creating the Emboss feature
- Mirroring the Emboss feature
- Creating Fillets
- Shelling the Model
- Adding Threads
- TUTORIAL 5
- Creating a 3D Sketch
- Creating the Sweep feature
- Creating the Along Curve pattern
- Editing the Freeform Shape
- Create another Freeform box
- TUTORIAL 6
- Start a new part file
- Creating the second feature
- Adding Threads
- Creating iParts
- TUTORIAL 7
- Creating the First Feature
- Creating the Extruded surface
- Replacing the top face of the model with the surface
- Creating a Face fillet
- Creating a Variable Radius fillet
- Shelling the Model
- Creating the Boss Features
- Creating the Lip feature
- Creating the Grill Feature
Chapter 6: Sheet Metal Modeling
- TUTORIAL 1
- Starting a New Sheet metal File
- Setting the Parameters of the Sheet Metal part
- Creating the Base Feature
- Creating the flange
- Creating the Contour Flange
- Creating the Corner Seam
- Creating a Sheet Metal Punch iFeature
- Creating a Punched feature
- Creating the Rectangular Pattern
- Creating the Bend Feature
- Applying a corner round
- Creating Countersink holes
- Creating Hem features
- Mirroring the Features
- Creating the Flat Pattern
- Creating 2D Drawing of the sheet metal part
Chapter 7: Top-Down Assembly and Motion Simulation
- TUTORIAL 1
- Creating a New Assembly File
- Creating a component in the Assembly
- Creating the Second Component of the Assembly
- Creating the third Component of the Assembly
- Adding Bolt Connections to the assembly
- Applying the constraint to the components
- TUTORIAL 2
- Creating the Slider Joint
- Creating the Rotational Joint
- Creating the Rigid Joint
- Driving the joints
Chapter 8: Dimensions and Annotations
- TUTORIAL 1
- Creating Centerlines and Centered Patterns
- Editing the Hatch Pattern
- Applying Dimensions
- Placing the Datum Feature
- Placing the Feature Control Frame
- Placing the Surface Texture Symbols
- Modifying the Title Block Information
- Additional Exercises
- Exercise 1
- Exercise 2
- Exercise 3
- Exercise 4
- Exercise 5
- Exercise 6

جهت خرید آموزش Autodesk Inventor 2016 Learn by doing و دانلود آن بر لینک افزودن به سبد خرید در پنجره بالا کلیک نمایید.
!!لطفا قبل از خرید از فرشگاه اینترنتی برتر فایل قیمت محصولات ما را با سایر محصولات مشابه و فروشگاه ها مقایسه نمایید!!


دیدگاه خود را بنویسید